
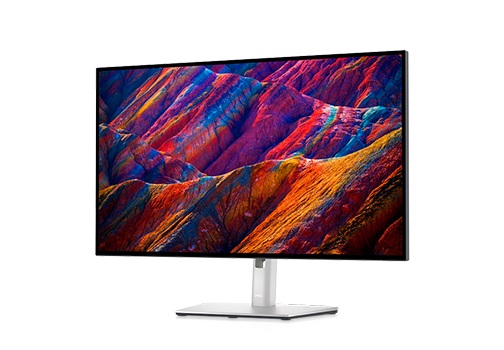
看显示器的商品页时,90W 是个容易找到的数字。翻到机身底视图,我却得多找一会儿。三个长得一样的 USB-C 口里,哪一个能接电脑?
我想一根 USB-C 线接屏幕、顺便给笔记本充电,到底该插哪个口?能充多少瓦?
我把 Dell UltraSharp U2723QE 的商品页和手册放在一起看。90W 对应背部 #5。第二台电脑走 USB 数据用 #8,底边 #15 才是给外设供电的口。把这些数字写到页面里之前,还得确定你拿的是哪一版图。
- 商品页给功率,手册给位置。 Dell 美国站的 Tech Specs → Connectivity → Interfaces 分开列了最高 90W 的主上行口和最高 15W 的下行口。页面上方的
up to 140W EPR出现在全系列筛选区。核对 U2723QE 时,应以这个型号的规格为准。 Dell U2723QE 商品页 - 零售图的编号可能不同。 Dell 手册底视图上,#13 是网口,给外设供电的 USB-C 是 #15。SCAN 的简图合并了部分 USB-A 接口,把同一个外设口标成 #13。实际落稿时,图例要跟所选底图一起核。 Dell 手册第 12–13 页、SCAN 图例
价格旁、接口图、规格表怎么写
价格旁写清用哪根线
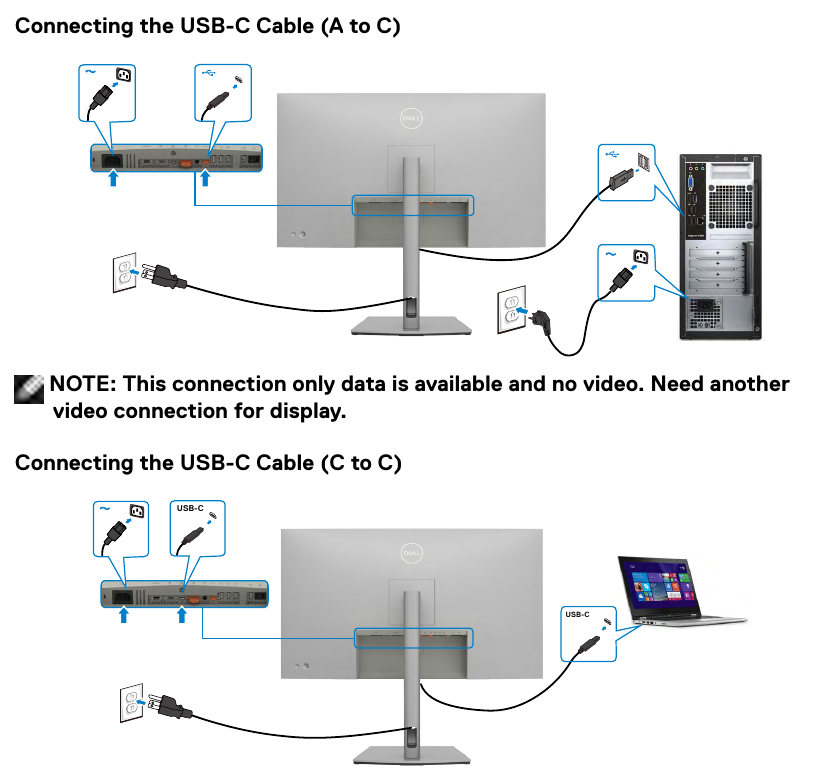
在加购按钮下面就能回答接线问题。把其他机型的 140W EPR 放回系列筛选区。筛选器和购买说明挨得近时,在选项旁标清对应型号。
购买说明示例(对应 Dell 手册版):
USB-C 一线连与供电说明
* 一线连能力:支持(请插背部 #5 号口,最高 90W(20V/4.5A))。单根 USB-C 线可同时传输 4K 60Hz 视频(DP 1.4 Alt Mode)、USB 扩展坞数据与最高 90W 笔记本供电。USB 口标称最高 10Gbps,实际视频与数据速率受主机、线材和显示器的 USB-C Prioritization 设置影响。
* 连接条件:使用的笔记本端口需支持 DP Alt Mode 视频输出和 USB PD 受电。Windows 端按手册使用 Windows 10 或以上版本。90W 是屏幕端上限,主机按支持档位协商。Dell 手册将额定 130W 的笔记本列为不支持的充电档,按主机要求保留原装电源。
* 随附线材:请用包装内的 1.0m USB-C 转 USB-C 全功能线;另一根 1.0m USB-A 转 USB-C 线 仅用于给 HDMI/DP 电脑扩展 USB 接口。
* 其他 USB-C 接口区分:背部 #8 号口只走数据(画面另接,不用于给笔记本充电);底边 #15 号口给外设供电(最高 15W,无视频)。
让人对着图找到接口
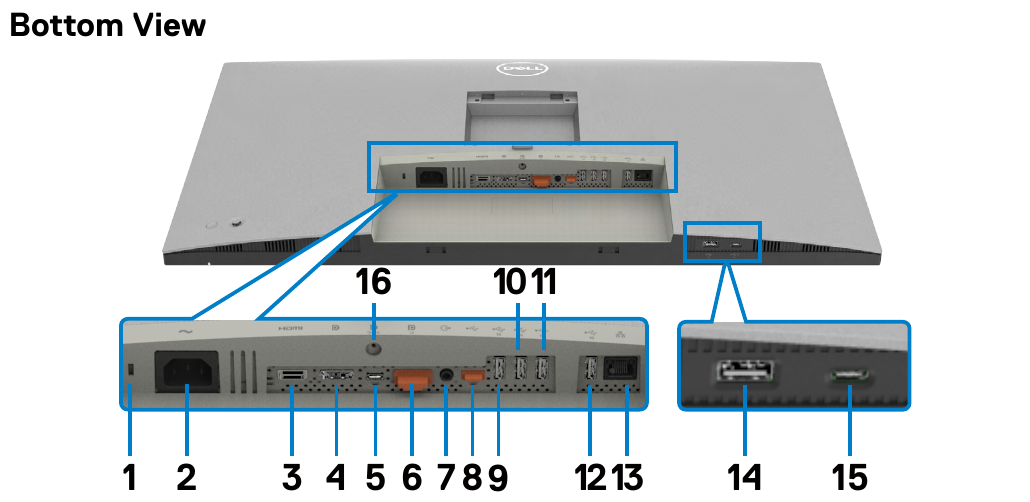
图上的编号负责指位置,图下的 HTML 文字负责讲用途。把图缩到手机宽度试试看,字太小的时候,买家还可以接着读图例。可见文字也方便站内导购或搜索工具拿到完整的接线条件。
接口图文字图例示例(编号对应 Dell 官方手册):
- #1 安全锁孔(背部最左):防盗锁槽。
- #2 电源接口(背部左侧):接 AC 电源线。
- #3 HDMI 接口(背部中左):4K 60Hz 视频输入(HDCP 2.2)。
- #4 DisplayPort (in)(背部中左):DP 1.4 视频输入(4K 60Hz)。
- #5 USB-C 3.2 Gen 2 主上行口(背部中段):接兼容笔记本|DP 1.4 (4K 60Hz) 视频 + 10Gbps 数据 + 最高 90W(20V/4.5A)供电。
- #6 DisplayPort (out)(背部中段):MST 菊花链输出(用前取下橡胶塞)。
- #7 音频线路输出口(背部中右):接有源音箱(不支持耳机)。
- #8 USB-C 3.2 Gen 2 副上行口(背部偏右):只走数据(10Gbps 上行,配合 HDMI/DP 启用 KVM)|无视频|不用于给笔记本充电(用前取下橡胶塞)。
- #9–#12 USB-A 下行口 × 4(背部偏右):10Gbps 外设数据口。
- #13 RJ45 千兆网口(背部右侧):1GbE 有线网络。
- #14 USB-A 快充下行口(机身底边):10Gbps 数据 + BC 1.2(最高 7.5W)外设供电。
- #15 USB-C 3.2 Gen 2 下行口(机身底边):给外设供电与 10Gbps 数据下行|无视频|最高 15W(5V/3A)。
Dell 手册图版与 SCAN 宣传图版(1–13 号)的编号对照:
如果设计稿采用 Scan UK 的 1–13 号图,从 #9 开始,部分接口编号就会与 Dell 手册版不同。制作页面时,图片、图例和后台记录必须使用同一套编号,不能混搭:
| 机身接口位置 | 手册图版编号(1–15 号) | SCAN 图版编号(1–13 号) | 差异原因与核对要点 |
|---|---|---|---|
| 背部中段:USB-C 主上行口(接兼容笔记本,最高 90W) | #5 | #5 | 两版编号一致 |
| 背部偏右:USB-C 副上行口(只走数据) | #8 | #8 | 两版编号一致 |
| 背部偏右:4 个 USB-A 下行口 | #9、#10、#11、#12 | #9 (3)、#10 | SCAN 图将前 3 个 USB-A 合并标为 #9 (3) |
| 背部右侧:RJ45 网口 | #13 | #11 | 因前序合并,编号顺移两位 |
| 机身底边:USB-A (BC 1.2) 口 | #14 | #12 | 因前序合并,编号顺移两位 |
| 机身底边:USB-C 下行口(给外设供电,最高 15W) | #15 | #13 | 最易混点:选哪张底图,图例和后台就填对应编号 |
按功能比较三款屏
买家看到页面底部的规格表,往往是在几款候选产品之间做最后比较。例如 Dell U2723QE、ASUS ProArt PA279CRV 和 BenQ PD2705U 都有 USB-C 接口,但接口配置和供电能力并不相同。与其把所有内容塞进一行 Interfaces,不如按功能拆开,让不同型号可以逐项比较:
| 拆行后的规格字段 | Dell UltraSharp U2723QE(手册 15 号版) | ASUS ProArt PA279CRV | BenQ DesignVue PD2705U |
|---|---|---|---|
| USB-C 一线连(画面+笔记本充电) | 支持(请插 #5 号口,最高 90W(20V/4.5A)) | 支持(USB-C 上行口,最高 96W) | 支持(USB-C 上行口,最高 65W) |
| 笔记本最大充电功率 (PD) | 最高 90W(20V/4.5A, 15V/3A, 9V/3A, 5V/3A) | 最高 96W | 最高 65W |
| USB-C 主上行口规格 | #5 号口|DP 1.4 Alt Mode (4K 60Hz)|10Gbps 上行 | DP Alt Mode|USB 3.2 Gen 1 | DP Alt Mode (4K 60Hz)|USB 3.2 |
| USB-C 副上行口(只走数据) | #8 号口|只走数据(10Gbps 上行,画面另接) | 无 | 无(配 USB-B 上行口) |
| USB-C 外设下行口 | #15 号口|给外设供电(最高 15W 5V/3A,10Gbps,无视频) | 1 × USB 3.2 Gen 1 Type-C 下行 | 1 × USB-C 下行 |
| 随附 USB-C 线材 | 1×1.0m C-to-C 全功能线;1×1.0m A-to-C 数据线 | 1×USB-C 线(依销售区域而定) | 1×USB-C 线 |
| 主机端连接条件 | 笔记本 C 口需支持 DP 1.4 Alt Mode 与 PD;Windows 10 及以上 | 笔记本 C 口需支持 DP Alt Mode 与 PD | 笔记本 C 口需支持 DP Alt Mode 与 PD |
实际连接时,还要把显示器和电脑两端的接口一起核对。如果用 #8 连接 USB 数据,同时另接 HDMI 或 DP 输出画面,需要在显示器菜单中检查视频输入与 USB 上行口的配对。若使用 C–C 线后仍发现速度不符,先检查 Display → USB-C Prioritization 设置。 Dell 随箱线材与接线、充电档位、USB-C 优先级
exist Shopify 里只维护一份接口资料
单改这一款,三处文案直接写好就行。商品一多,运营只换了底视图,购买区和规格表里很可能还留着上一版编号。把每个口建成一条记录,商品选主口,三个模块就能读同一份资料。
先确定规格属于商品,还是属于变体
只是延保或配件不同,接口规格放在 Products 就够了。随箱线材按销售地区核实。如果切换选项会换一块接口板或改变供电能力,相关字段建在 Variants,再把商品级的 specs.use_variant_specs 设为 true。示例按当前变体取整组规格,缺字段时显示「待确认」。
创建元对象,并录入三个接口
- exist Settings → Metafields and metaobjects → Metaobjects → Add definition 创建
USB-C Port Spec,把 type 设为usb_c_port_spec。port_number和power_delivery_watts选整数,表中其余字段选单行文本。再加一个单行文本作后台显示名,例如U2723QE · #5 · 主上行。允许店面读取,使用条目发布状态时把三条都设为 Active。 - exist Content → Metaobjects → USB-C Port Spec → Add entry 建三条,按手册版填写下表。如果店铺采用 SCAN 版图,给那套图和条目使用另一版代号,逐条核对编号后再替换引用。 Shopify 创建元对象条目
| 键 | #5 主上行 | #8 副上行 | #15 外设下行 |
|---|---|---|---|
model_code |
U2723QE |
U2723QE |
U2723QE |
diagram_revision |
dell-user-guide-bottom |
dell-user-guide-bottom |
dell-user-guide-bottom |
port_number |
5 |
8 |
15 |
role_key |
host_video_pd |
host_data |
accessory_downstream |
port_name |
USB-C 主上行口 | USB-C 副上行口 | USB-C 快插下行口 |
physical_location |
背部接口槽 | 背部接口槽 | 机身底边快插区 |
primary_role |
笔记本一线连 | 第二台主机的 USB 数据,不用于给笔记本充电 | 外设数据及供电 |
video_input |
DP 1.4 Alt Mode,符合条件时最高 4K 60Hz | 画面另接 HDMI #3 或 DP In #4 | 无视频输入 |
power_delivery_watts |
90 |
留空 | 15 |
pd_voltage_current |
20V/4.5A、15V/3A、9V/3A、5V/3A |
留空 | 5V/3A |
data_rate |
USB 3.2 Gen 2 上行,接口标称最高 10Gbps | USB 3.2 Gen 2 上行,接口标称最高 10Gbps | USB 3.2 Gen 2 下行,接口标称最高 10Gbps |
在商品中引用这三条接口记录
接下来到 Settings → Metafields and metaobjects → Products → Add definition 创建商品字段,再进入 Products → 对应商品 → Metafields 填入对应值。下表以 U2723QE 为例,字段值依据公开资料整理。 Shopify 创建自定义元字段
| Namespace and key | 类型 | 这款显示器怎么填 |
|---|---|---|
specs.one_cable_supported |
True or false | true。规格没核实先留空,确实不支持才填 false |
specs.model_code |
Single-line text | U2723QE |
specs.primary_usb_c_port |
单个 Metaobject reference | 选 #5,限制类型为 usb_c_port_spec |
specs.usb_c_ports |
Metaobject reference 列表 | 选 #5、#8、#15。主口也必须出现在列表中 |
specs.included_usbc_cables |
Multi-line text | 1 米 C–C 用于一线连,1 米 A–C 只走数据,视频另接 HDMI/DP |
specs.host_requirements |
Multi-line text | 所用电脑端口要支持 DP Alt Mode 视频输出及 USB PD 受电,Windows 端按手册使用 Windows 10 或以上版本 |
specs.port_diagram_image |
File reference,仅图片 | 有授权时上传 u2723qe_ports_dell-user-guide-bottom.png。没有图也可显示文字图例 |
specs.port_diagram_revision |
Single-line text | dell-user-guide-bottom |
specs.spec_source_url |
URL | Dell 手册的底视图链接 |
specs.use_variant_specs |
True or false,商品级开关 | 单一硬件留空或 false。只有需要随变体读取接口规格的商品设为 true |
90W 从主口记录的 power_delivery_watts 读取。店里已经有独立的 specs.max_pd_wattage 时,先查哪些主题、筛选器和 Feed 在读它,再安排迁移,别让日常维护的人重复手填两个数。
先在未发布的主题副本中接入 Liquid
到 Online Store → Themes 复制当前主题。打开副本的 Edit code,新建 snippets/product-usbc-specs.liquid。从附录把 usb_c 字典合并到当前语言的 locale 文件。再找这个商品模板实际用的主商品 section。Dawn 的第一行可以贴在 buy_buttons 块旁边,另外两行放到接口图和规格表的位置。
{% render 'product-usbc-specs', product: product, placement: 'decision' %}
{% render 'product-usbc-specs', product: product, placement: 'diagram' %}
{% render 'product-usbc-specs', product: product, placement: 'table' %}
举个换图时容易遇到的情况。运营只把文件换成 u2723qe_ports_scan-ports.png,商品的图版还填 dell-user-guide-bottom。模板看到文件名后缀对不上,购买区就会显示「待确认」。主口的功率取自引用记录,型号、图版、角色、列表归属和重复编号也一起查。最后打开图核对编号和位置,文件名无法代替这一步。
如果商品页允许买家切换不同硬件变体,先用带 ?variant=实际变体ID 的地址检查服务器返回的内容。之后,在主题现有的变体更新流程中调用 Section Rendering API,获取该地址对应的主商品 section,并同步更新三个规格容器,以及价格、选项和加购 ID。测试时不要只看价格有没有变化,还要确认接口说明没有残留上一款变体的数据。 Shopify Section Rendering API、Dawn 主商品 section
如果页面已经通过 {{ product | structured_data }} 输出商品 JSON-LD,可以先完成三处可见内容,不必急着改结构化数据。只有在能够控制现有 Product 生成逻辑时,再考虑把示例中的 properties 合并到该对象的 additionalProperty,同时保留原有报价、库存和变体信息。结构化属性应与页面正文表达一致;至于站外系统是否会引用这些信息,仍需单独测试。 Shopify structured_data、Schema.org additionalProperty
用同一个问题验收
Dell U2723QE 能不能一根 USB-C 同时出画面、给笔记本充电?插哪个口,最高多少瓦?
拿手机预览,先停在价格旁。找 #5、最高 90W 和笔记本的接口条件。往下滑,把图片和图例里的 #5、#8、#15 指一遍。再关掉图片,看看靠文字能否找对口。规格表过宽就让它横向滚动,或按型号分组,保留功能和型号的对应关系。
我会单独看服务器返回的购买区节点。全页搜到 90W 很容易,它可能在系列筛选里,也可能藏在另一条数据里。购买区要把 U2723QE、#5、笔记本供电和主机条件写到一起。如果加了 JSON-LD 扩展,再解析当前 Product 对象。笔记本功率是数值 90、单位为瓦,15W 要留在外设接口那一行。笔记本功率和主口明细从同一条记录取。
在本地复跑四种配置
本地把 Shopify 形状的样例对象交给 Liquid 渲染器,逐次只改一个输入。表里同时列了购买区文案和可选的 properties 数组。现有 Dawn 的 Product JSON-LD 还需在目标主题副本里查。
| 输入 | 购买区 | 扩展属性 |
|---|---|---|
| 图版和三条记录一致,主口引用 #5,明确支持 | 显示「连接背部 #5 主上行口」及最高 90W | 笔记本功率为数值 90,另列 #8 的数据用途和 #15 的 15W |
只把图片换成带 scan-ports 的文件名 |
显示「一线连条件待确认」 | [] |
主口引用空着,支持仍填 true |
显示「一线连条件待确认」 | [] |
one_cable_supported 明确填 false |
显示「不支持用单根 USB-C 线同时传画面与为笔记本充电」 | 支持状态为布尔值 false |
最后检查 AI 是否引用了自家页面
等自家商品页公开可抓取,就用同一句问题去问。记下回答、引用 URL、地区和日期。点开引用后,逐项核对下面三件事。
- 答案准不准。 说清 #5、最高 90W、主机端要求。把 140W 系列选项带进来,或者让人去插 #8,均需定位错项。
- 来源是不是自家页面。 Dell 手册本身足够让模型答对。模型只引用了手册时,记录本次「本站未被引用」。
- 引用原文能不能支持这句话。 打开引用,看能否在指向的型号页面找到同一段证据。如果只指向混排的接口表,补购前说明或图例后,用相同问题再跑一次。引用和排序以实际复测为准。 Dell 型号规格、Google AI 搜索功能说明
这篇的端口规格来自 Dell 公开资料,四组页面输出来自本地样例。到自己的店铺时,先在主题预览核对版式、变体和实际图片 URL,上线后再查 AI 的引用。
附录 A · 可复制的 Liquid 与中文 locale
把第一段保存为 snippets/product-usbc-specs.liquid,把第二段的 usb_c 对象合并到现有 locales/zh-CN.json。现有 Product JSON-LD 自行可控时,可用第三段拿到扩展属性数组。
{% doc %}
  Render shared USB-C specifications for a product.
  @param {product} product - The product owning the specs metafields.
  @param {string} placement - decision, diagram, table, or properties.
  @example
    {% render 'product-usbc-specs', product: product, placement: 'decision' %}
{% enddoc %}
{%- liquid
  assign owner = product
  if product.metafields.specs.use_variant_specs.value == true
    assign owner = product.selected_or_first_available_variant
  endif
  assign specs = owner.metafields.specs
  assign supported = specs.one_cable_supported.value
  assign model_code = specs.model_code.value
  assign revision = specs.port_diagram_revision.value
  assign ports = specs.usb_c_ports.value
  assign main_port = specs.primary_usb_c_port.value
  assign main_handle = main_port.system.handle
  assign main_number = main_port.port_number.value
  assign main_watts = main_port.power_delivery_watts.value
  assign main_profiles = main_port.pd_voltage_current.value
  assign requirements = specs.host_requirements.value
  assign cables = specs.included_usbc_cables.value
  assign diagram = specs.port_diagram_image.value
  assign source_url = specs.spec_source_url.value
  assign diagram_matches = true
  if diagram != blank
    assign diagram_filename = diagram.preview_image | image_url: width: 1200 | split: '?' | first | split: '/' | last
    assign revision_marker = revision | prepend: '_' | append: '.'
    unless diagram_filename contains revision_marker
      assign diagram_matches = false
    endunless
  endif

  assign valid_list = true
  assign found_main = false
  assign numbers = '|'
  for port in ports
    assign number = port.port_number.value
    assign number_marker = number | prepend: '|' | append: '|'
    if port.model_code.value != model_code or port.diagram_revision.value != revision
      assign valid_list = false
    endif
    if number == blank or numbers contains number_marker
      assign valid_list = false
    endif
    if port.port_name.value == blank or port.physical_location.value == blank or port.primary_role.value == blank
      assign valid_list = false
    endif
    if port.video_input.value == blank or port.data_rate.value == blank
      assign valid_list = false
    endif
    assign numbers = numbers | append: number | append: '|'
    if main_handle != blank and port.system.handle == main_handle
      assign found_main = true
    endif
  endfor

  assign mode = 'pending'
  if supported == false
    assign mode = 'unsupported'
  elsif supported == true and found_main and valid_list and diagram_matches
    if model_code != blank and revision != blank and requirements != blank and cables != blank
      if main_port.role_key.value == 'host_video_pd' and main_watts != blank and main_watts > 0
        assign mode = 'ready'
      endif
    endif
  endif

  assign support_label = 'usb_c.pending' | t
  if mode == 'ready'
    assign support_label = 'usb_c.supported' | t
  elsif mode == 'unsupported'
    assign support_label = 'usb_c.unsupported' | t
  endif
  assign title = 'usb_c.title' | t
  assign watts_label = 'usb_c.host_power' | t
  assign requirements_label = 'usb_c.requirements' | t
  assign cables_label = 'usb_c.cables' | t
  assign port_label = 'usb_c.port' | t
  assign video_label = 'usb_c.video' | t
  assign data_label = 'usb_c.data' | t
  assign port_power_label = 'usb_c.port_power' | t
-%}

{%- case placement -%}
  {%- when 'decision' -%}
    <aside class="usbc-decision-card" aria-label="{{ title | escape }}">
      <h3>{{ title | escape }}</h3>
      {%- if mode == 'ready' -%}
        <p><strong>{{ product.title | escape }}</strong>:
          {{ 'usb_c.connection' | t: number: main_number, watts: main_watts, video: main_port.video_input.value | escape }}
        </p>
        <p><strong>{{ requirements_label | escape }}:</strong>{{ requirements | escape | newline_to_br }}</p>
        <p><strong>{{ cables_label | escape }}:</strong>{{ cables | escape | newline_to_br }}</p>
        <a href="#usbc-port-diagram">{{ 'usb_c.view_ports' | t | escape }}</a>
      {%- else -%}
        <p>{{ support_label | escape }}</p>
      {%- endif -%}
    </aside>

  {%- when 'diagram' -%}
    {%- if mode == 'ready' -%}
      <figure id="usbc-port-diagram" class="usbc-port-diagram">
        {%- if diagram.media_type == 'image' and diagram.preview_image != blank -%}
          {%- assign diagram_alt = 'usb_c.diagram_alt' | t: model: model_code -%}
          {{ diagram.preview_image | image_url: width: 1200 | image_tag: widths: '360, 540, 800, 1200', sizes: '(min-width: 990px) 820px, 100vw', loading: 'lazy', alt: diagram_alt }}
        {%- endif -%}
        <figcaption>
          <h3>{{ 'usb_c.legend' | t | escape }}</h3>
          <ol class="usbc-port-legend" role="list">
            {%- for port in ports -%}
              <li value="{{ port.port_number.value }}">
                <strong>#{{ port.port_number.value }} {{ port.port_name.value | escape }}</strong>
                ({{ port.physical_location.value | escape }}):{{ port.primary_role.value | escape }}。
                {{ video_label | escape }}:{{ port.video_input.value | escape }}。
                {%- if port.power_delivery_watts.value != blank -%}
                  {{ port_power_label | escape }}:{{ port.power_delivery_watts.value }}W。
                {%- endif -%}
              </li>
            {%- endfor -%}
          </ol>
          {%- if source_url != blank -%}
            <a href="/en/{{ source_url | escape }}/">{{ 'usb_c.diagram_source' | t | escape }}</a>
          {%- endif -%}
        </figcaption>
      </figure>
    {%- endif -%}

  {%- when 'table' -%}
    <table class="usbc-spec-table">
      <caption>{{ product.title | escape }} · {{ 'usb_c.specifications' | t | escape }}</caption>
      <tbody>
        <tr><th scope="row">{{ title | escape }}</th><td>{{ support_label | escape }}</td></tr>
        {%- if mode == 'ready' -%}
          <tr>
            <th scope="row">{{ watts_label | escape }}</th>
            <td>{{ main_watts }}W{% if main_profiles != blank %}({{ main_profiles | escape }}){% endif %}</td>
          </tr>
          {%- for port in ports -%}
            {%- assign number = port.port_number.value -%}
            <tr>
              <th scope="row">{{ port_label | escape }} #{{ number }}</th>
              <td>{{ port.port_name.value | escape }} · {{ port.physical_location.value | escape }} · {{ port.primary_role.value | escape }}</td>
            </tr>
            <tr><th scope="row">#{{ number }} · {{ video_label | escape }}</th><td>{{ port.video_input.value | escape }}</td></tr>
            <tr><th scope="row">#{{ number }} · {{ data_label | escape }}</th><td>{{ port.data_rate.value | escape }}</td></tr>
            {%- if port.power_delivery_watts.value != blank -%}
              <tr>
                <th scope="row">#{{ number }} · {{ port_power_label | escape }}</th>
                <td>{{ port.power_delivery_watts.value }}W{% if port.pd_voltage_current.value != blank %}({{ port.pd_voltage_current.value | escape }}){% endif %}</td>
              </tr>
            {%- endif -%}
          {%- endfor -%}
          <tr><th scope="row">{{ cables_label | escape }}</th><td>{{ cables | escape | newline_to_br }}</td></tr>
          <tr><th scope="row">{{ requirements_label | escape }}</th><td>{{ requirements | escape | newline_to_br }}</td></tr>
        {%- endif -%}
      </tbody>
    </table>

  {%- when 'properties' -%}
    [
      {%- if mode == 'ready' -%}
        {"@type":"PropertyValue","name":{{ title | json }},"value":true},
        {"@type":"PropertyValue","name":{{ watts_label | json }},"value":{{ main_watts | json }},"unitCode":"WTT"},
        {%- for port in ports -%}
          {%- assign port_name = port_label | append: ' #' | append: port.port_number.value -%}
          {%- capture port_value -%}
            {{ port.port_name.value }} · {{ port.physical_location.value }} · {{ port.primary_role.value }};
            {{ video_label }}:{{ port.video_input.value }};{{ data_label }}:{{ port.data_rate.value }}
            {%- if port.power_delivery_watts.value != blank %};{{ port_power_label }}:{{ port.power_delivery_watts.value }}W{% endif -%}
          {%- endcapture -%}
          {"@type":"PropertyValue","name":{{ port_name | json }},"value":{{ port_value | strip | json }}},
        {%- endfor -%}
        {"@type":"PropertyValue","name":{{ cables_label | json }},"value":{{ cables | json }}},
        {"@type":"PropertyValue","name":{{ requirements_label | json }},"value":{{ requirements | json }}}
      {%- elsif mode == 'unsupported' -%}
        {"@type":"PropertyValue","name":{{ title | json }},"value":false}
      {%- endif -%}
    ]
{%- endcase -%}
{
  "usb_c": {
    "title": "USB-C 一线连与供电",
    "supported": "支持;请核对主机端口和线材要求。",
    "unsupported": "不支持用单根 USB-C 线同时传画面与为笔记本充电。",
    "pending": "一线连条件待确认,请查阅该型号的官方规格。",
    "connection": "连接背部 #{{ number }} 主上行口:{{ video }},并为兼容笔记本提供最高 {{ watts }}W USB PD。",
    "requirements": "主机端连接条件",
    "cables": "随附 USB-C 线材",
    "view_ports": "查看接口位置",
    "diagram_alt": "{{ model }} 机身底视图,接口位置与编号见下方图例",
    "legend": "USB-C 接口位置与接法",
    "diagram_source": "查看接口图编号出处",
    "specifications": "USB-C 技术规格",
    "port": "USB-C 接口",
    "video": "视频输入",
    "data": "USB 数据",
    "host_power": "给笔记本的最高 USB PD 功率",
    "port_power": "此接口的最高供电"
  }
}
{%- capture usb_c_properties -%}
  {%- render 'product-usbc-specs', product: product, placement: 'properties' -%}
{%- endcapture -%}
附录 B · 本地复跑的数据输入
以下是三条接口记录的样例值。按正文的商品字段设置引用,先渲染 decision,再渲染并解析 properties。每次只换一项输入,再比对正文的四行结果。
[
  {
    "model_code": "U2723QE",
    "diagram_revision": "dell-user-guide-bottom",
    "port_number": 5,
    "role_key": "host_video_pd",
    "port_name": "USB-C 主上行口",
    "physical_location": "背部接口槽",
    "primary_role": "笔记本一线连:画面、USB 数据及主机供电",
    "video_input": "DP 1.4 Alt Mode;最高 3840 × 2160 @ 60Hz",
    "power_delivery_watts": 90,
    "pd_voltage_current": "20V/4.5A、15V/3A、9V/3A、5V/3A",
    "data_rate": "USB 3.2 Gen 2 上行,接口规格最高 10Gbps"
  },
  {
    "model_code": "U2723QE",
    "diagram_revision": "dell-user-guide-bottom",
    "port_number": 8,
    "role_key": "host_data",
    "port_name": "USB-C 副上行口",
    "physical_location": "背部接口槽",
    "primary_role": "连接第二台主机的 USB 数据;不用于给笔记本充电",
    "video_input": "无视频输入;另接 HDMI #3 或 DP In #4",
    "power_delivery_watts": null,
    "data_rate": "USB 3.2 Gen 2 上行,接口规格最高 10Gbps"
  },
  {
    "model_code": "U2723QE",
    "diagram_revision": "dell-user-guide-bottom",
    "port_number": 15,
    "role_key": "accessory_downstream",
    "port_name": "USB-C 快插下行口",
    "physical_location": "机身底边快插区",
    "primary_role": "连接 USB 外设并向兼容外设供电",
    "video_input": "无视频输入",
    "power_delivery_watts": 15,
    "pd_voltage_current": "5V/3A",
    "data_rate": "USB 3.2 Gen 2 下行,接口规格最高 10Gbps"
  }
]

WESWOO — Shopify Storefront Development
We help Chinese brands expand internationally with storefront development and Shopify Plus integration services, supporting their cross-border commerce operations.
- Shopify storefront branding
- International UI design
- Multichannel social media marketing